Have you heard about reverse tie-dye? Tie-dye became very popular in the early sixties to the eighties and has managed to be a recurrent trend, and it has not gone out of style after centuries. It is an accessible trend that anyone can DIY at home as all you need is bleach. The reverse dye technique is also super affordable and a fun activity with family and friends. You and your family or friends will absolutely love it. Perfect for anyone looking for cool and fun craft projects to do with others.
What Is Reverse Tie-Dye?
Traditional tie-dye requires adding colored dye to a light-colored fabric, and reverse bleach tie-dye is the complete opposite. Dyeing with bleach will remove color instead of adding it. As bleach reacts with fabric, it breaks down the colors in the fibers. Bleach tie-dyeing uses diluted bleach to take the color from dark fabric so the bleached areas will absorb bright new colors.
What Can You Reverse Tie Dye?
You can reverse tie-dye anything like a t-shirt, hoodie, bedsheet, tank top, pants, and hats. A perfect technique to turn your old t-shirts or old clothes into trendy pieces. If you have any clothing with bleach stains or other stains, this is the perfect time to turn your damaged piece into something unique.
When it comes to fabric type, you can't reverse dyeing acrylic, nylon, silk, spandex, wool, or polyester. These materials tend to resist bleach, so the technique wouldn't work on them.
Be Careful with Bleach Solution During Reverse Tie Dye Process
Be precautious when using a bleach solution, put on a mask and gloves, and make sure that you are in a place where fresh air is abundant.
You can also reverse dye with a bleach pen, and it's a cool way to add specific designs and shapes to your colored tee.
How to Reverse Tie-dye Step By Step
1. Determine The Pattern
Before starting the reverse tie-dye process, decide what pattern you want.
2. Gather Reverse Dye Supplies And Equipment
Besides the item you wish to reverse tie-dye, you will also need the following:
Supplies
- Bleach diluted with water. This mix should be 50/50
- Rubber bands/clips or twine
- A surface such as cardboard/ Newspaper or an already bleached stained towel.
- A spray bottle/ Empty container to mix your solution.
- Hydrogen peroxide
Equipment
- Plastic bin
- Measuring cup
- Disposable Gloves
3. Set Up The Work Area
To reverse a tie-dye shirt, you'll want to do this activity somewhere with plenty of breathing room as you will be using a bleach solution.
You will also need a flat space where you can fold cloth. If you are using a kitchen table, place a disposable tablecloth or cookie sheet to protect your table in case of any spillage.
4. Wet, Dampen, Or Dry Shirt
You can reverse dye either a damp, wet, or dry shirt. A slightly damp shirt will help with folding.
If you pre-soaked the fabric, the liquid bleach solution would flow when applied, creating somewhat blurry lines. To pre-soak, allow your shirt to sit in water for about 2 minutes and wring it out by hand.
A dry shirt on the hand will pretty much stay where you apply it and result in more precise, more crisp lines.
5. Fold, Twist Or Scrunch The Dyeing Fabric
Fold, twist or scrunch the item you are dyeing, then tie it with your rubber bands. Once you've chosen the technique you are satisfied with, begin to spray or pour your diluted bleach solution onto the garment.
6. Prepare And Apply A Bleach And Water solution.
Mix one cup of bleach with one cup of water, as undiluted bleach is too strong and can damage your fabric.
Put on gloves, pour the solution onto the shirt, and make sure you get all the folds and it's fully saturated.
7. Let The Bleach Solution React
Let the item or shirt sit in the diluted solution for 5 to 20 minutes or even longer until you see the color fading. You want to check on the progress periodically to ensure it's working.
The specific time will depend on the material and color of fabric you are reverse tie-dying. For example, it can take 15 to 20 minutes to bleach a black shirt.
8. Neutralize The Solution
Use the hydrogen peroxide to stop the bleach's reaction.
9. Rinse And Unfold
Rinse out any remaining solution by running it under cold water and then unfold.
10. Wash And Dry
Once you are happy with the result, place it in the washing machine immediately and wash on cold. Then place it in the dryer and let it dry completely. You can also hand wash the shirt and avoid waiting too long as any remaining bleach and eat through the fabric.
A Quick Step By Step
- Plan ahead
- Gather supplies
- Prepare workstation and diluted solution.
- You can start this process on a dry garment or by wetting it.
- Fold, twist, and scrunch the fabric however you please.
- Apply your solution.
- Allow the solution to sit for 20 minutes.
- Pour your hydrogen peroxide onto the garment to neutralize the solution.
- Unfold the article of clothing and rinse it thoroughly using cold water.
- Wash and dry.
Reverse Tie-Dye Techniques
Reverse tie-dye is a fun and easy way to get crafty! You can do multiple techniques to create cool and unique dye patterns. The most widely known methods are scrunching, folding, and wrapping. We are going to give you a quick rundown of these methods, and you can choose which is best for you. The first method we will discuss is the scrunch technique, and some also refer to this as the "crumple" technique.
Scrunching/Crumpling
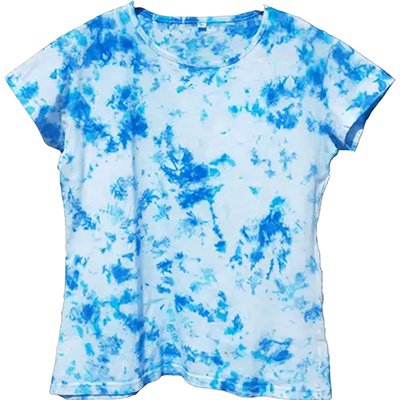
It's exactly what it sounds like, and it is very easy to do! Reverse tie-dye is an easy do-it-yourself activity, and you can even do it with your children. Note that children should be supervised at all times during this.
We've all crumpled up a piece of paper, and this is what you'll do with your clothing item of choice. After you've scrunched your fabric up as much as you see fit, you'll take your rubber bands and tie it up! Allow this to soak for the allotted 20 minutes until you see the color fading. Your results will rival a cloudy sky or a marvelous galaxy.
Folding Reverse Tie Dye Technique
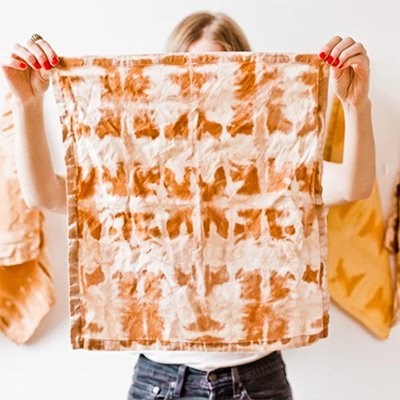
Image source: papernstitchblog.com
This method is just as easy as the scrunch technique. You have to lay the garment out flat and fold it up accordion style. After folding it up, your fabric should look stacked. Depending on the length of the stack, you will fold it into two halves and band it with rubber bands. Each fold you make will create a funky lined pattern. Once you are done, spray or pour the solution directly on the folded shirt.
Twist/Spiral Technique
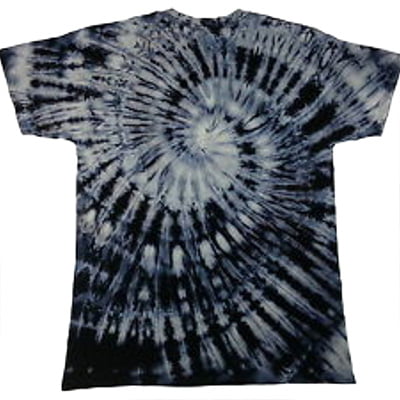
A classic custom looks for tie-dye, but it doesn't look as easy as it is. Don't judge a book by its cover, and this is actually a simple method. Decide on where exactly you would like to start your spiral. For this technique, you'll need a special tool that you can find in your kitchen: A fork. Just as you would twist your fork when eating pasta, that is exactly what you will do with your fabric. You will twist until your entire shirt is wrapped around the fork. After completely forming your garment into a circular shape, you want to put your rubber bands on.
All Done!
Wallah! Now you have a beautiful tie-dyed garment that you created on your own. Reverse tie-dye goods can be pricey when you buy them in the store, so crafting them yourself can save you a pretty penny. The reverse tie-dye technique is an easy beginner project, and whatever your results are will reflect your care-free spirit.
FAQs
What Brand Of Bleach To Use?
There is no specific brand of bleach you should use. In fact, you can get a pint of bleach at your local dollar store.
How Long Will Bleached Shirt Last For?
Once you have neutralized the bleach and washed the shirt, the shirt can last for a few months as long as you don't find any small holes.
Can You Wash Reverse Tie Dye Shirt With Other Clothing?
Yes, you can wash a reverse tie dye shirt with your regular clothing.
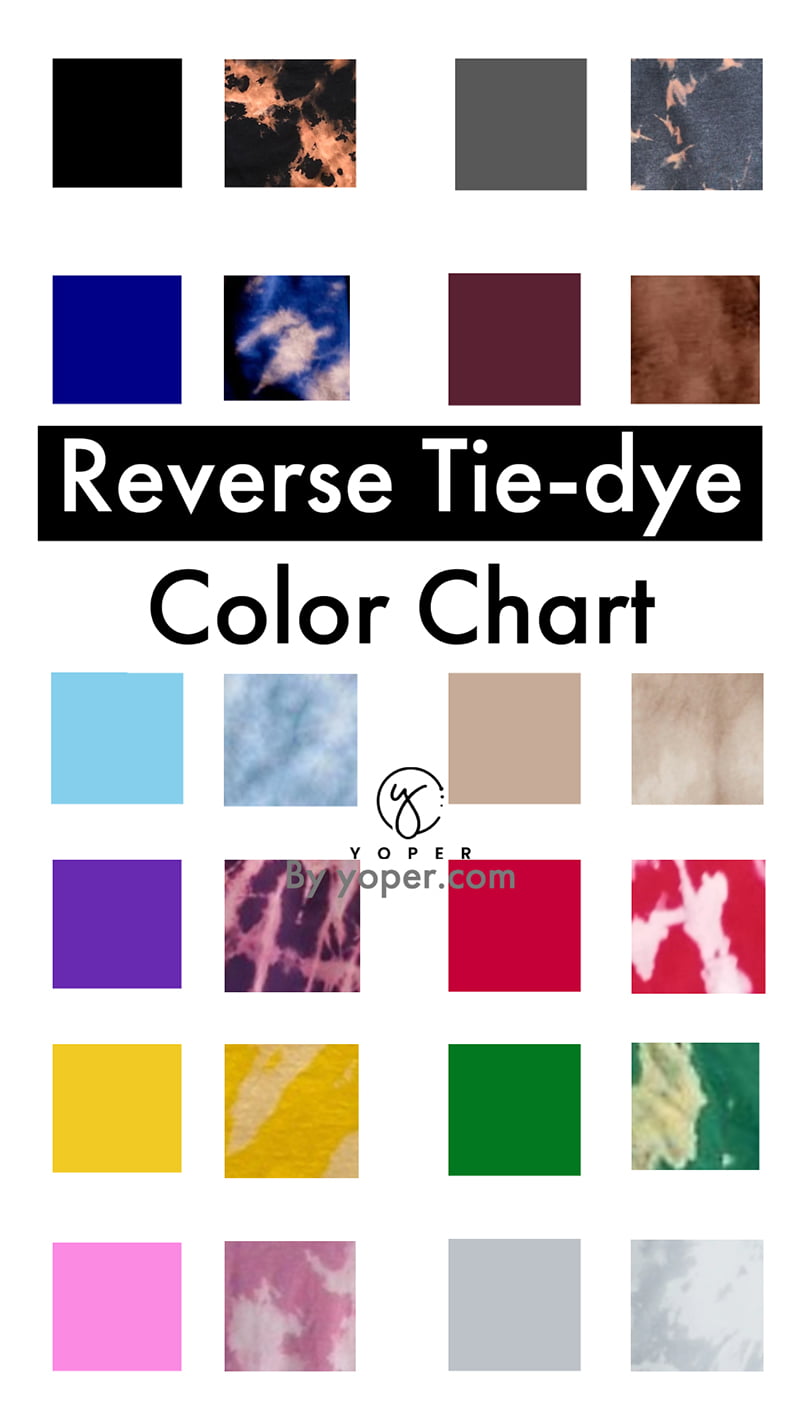
Will All Reverse Tie Dye Result in White?
No, depending on the specific color dye used on the original fabric, the result will vary. For example, a black shirt can result in a red/orange color.
Are There Alternatives To Using Bleach?
Besides bleach, you can use thiourea dioxide. This product uses a completely different process to remove the color from fiber, and it is less damaging but more expensive than bleach.

